Posts tonen met het label Raindrop Echo. Alle posts tonen

zaterdag 27 juli 2013

Happy birthday to my father in law!

Hi everybody!!

Today is the birthday of my father in law, Leo van der Veer, we are celebrating together outdoors with pancakes as a finish so it promises to be a fabulous day.... except that it's starting to rain here while I type but I'm hoping this will pass and then it'll be a gorgeous day.

For the birthdays of both my in laws (my mum in laws birthday was two months ago) we are taking them on a trip in the next few weeks. Because I did want to bring him something for his birthday I decorated the lid of this little box for him and we are going to give that filled with chocolaty goodness :).
The fabulous cow image is a new one by Crissy Armstrong for Whimsy Stamps. It's called You Moove Me and I loved coloring it. The fabulous letters are new stamps by Whimsy Stamps as well, these are by Raindrop Echo Designs and are called Just My Type. The letters can be cut with a matching die from a new Tiny Shapes Die Set but I have to admit I used my Nestabilities for the job. The stars were cut with Stacking Stars Die-Namics dies and the circles and scalloped circle with Nestabilities again. Lots of hand stitching and Frayed Burlap distress ink and Black Diamond Stickles finish the job. The design paper is Maja Design Life in the Country combined with white, black and red cardstock.
A close up of You Moove Me. Colored with Copic Markers and 3D paper pieced. Diamond stickles on the bell :).
A side view of the box. Hope you can see I've also embossed the Just My Type letters and star and little stars from the Stacking Stars.
And the little pieces :).

Hope you have a fabulous day no matter where you are!!

Hugs,

maandag 1 juli 2013

Wild Orchid Challenge daisies with boxes for twins

Hi everybody!

Today is the start of a new challenge at Wild Orchid Challenges and this time we want you to use daisies on your project. I actually have two samples to show you today since I decided to create baby gift-boxes for this challenge for not one but two little girls that were born on June 12th, two little twin girls named Lisa and Aurelia.
Now if you have been following me for a longer period of time you may recall that I have already used this stamp ones before. It's by Whipper Snapper Designs and it's called Floppy Bunny Trio and I used it in 2011 for a box for a little boy named Kian. I don't use stamps twice often but this stamp just matched the gifts I had so perfectly that I had to use it again (and again LOL). The pretty papers are from the Rosa Dotje A Flower a day Blauw/Roze paper pad combined with pink and kraft colored cardstock. I do believe the Rosa Dotje paper is Dutch so I'm not sure if it's available in other countries. The letters are cut out of Joy Crafts fine corrugated cardboard with Sizzlits Round-a-bout dies. The ticket with the birthdate is from the Whimsy Stamps Friendship Ticket Sentiments set, I stamped it with Distress Ink Frayed Burlap, distressed it with the same ink and wrote the date with the Frayed Burlap Distress Marker. The ribbon on top is from stash. The charms are Marianne Design Newborn Charms and the pearls are from a Flourish with a Bling pink pearl pack.

The Wild Orchid Crafts products that I used (for the two boxes) are:
Pink Set of Mixed Flowers (these aren't for sale at the moment but I hope they'll be back after WOC has moved)
Guipure White Lace (around the rim of the lid of the box for Lisa)
Shocking Pink 12mm Satin Ribbon (around the Aurelia box)
Baby Pink 12mm Satin Ribbon (around the Lisa box)
And a close up of both colored images, both colored with Copic Markers and both 3D paper pieced:
And the gifts we got the little ladies:
And finally, one of the two images in little pieces, I used exactly the same little pieces on the second image but only in different colors:
Hope that inspires you to join us at Wild Orchid Challenges! And can't wait to bring these boxes to the new mummy and daddy.

Have a great day everybody!!!

Hugs,


zaterdag 23 maart 2013

Published card with Playful Kitten(s)

Hey everybody,

I still owe you my card with the Birthday Baby Boy by Wee Stamps but I'm still waiting on a die that I really want to use on that card so you'll have to wait a little longer :). I do have a card I haven't shown here yet. Some months ago Denise Lynn, the owner of Whimsy Stamps, asked me if I wanted to do a card with one of the then soon to be released Playful Kittens by Wee Stamps for an English Magazine named Creative Stamping. Naturally I said yes and this is the card I made for them that was published in the no 8 issue of that magazine:


As always the kitten was colored with Copic Markers and 3D paper pieced but I don't have a picture of the little pieces, I do have a list of the materials I used:

Stamps: 
Playful Kittens by Wee Stamps (as digital image or rubber stamp), Everyday Mini Postage Stamps by Raindrop Echo Designs (and matching die)
Paper: 
Cardstock and My Mind's Eye The Sweetest Thing patterned paper
Embellishments: 
Pink self adhesive pearls from stash, lace from stash, Fabric Flowers from stash, Pebbles Inc Crystal Candy Dots (center of flower), stickles (platinum and frosted lace) and stitches by hand

Hope you liked this little cutie. Have a great day everybody!!

Hugs,

woensdag 20 maart 2013

Release Day at Wee Stamps and Whimsy Stamps with sample

Hello everybody!

Today it's that day of the month again, both Wee Stamps and Whimsy Stamps are releasing their new lines. Wee Stamps of course both as digital images and as rubber stamps through Whimsy Stamps. This month I have decided to only join in the releases with samples of the new Wee Stamps images/stamps so I won't be joining the Whimsy mini hops but you might want to do the hops because as always there are prices hidden along the way. First let me give you the details about the Whimsy release:

Today, Whimsy Stamps is releasing 27 fantastic new Rubber Stamps & Stamp Sets, 6 wonderful new Whimsy Shapeology Dies, 2 fabulous new Shape EZ by TLC templates, 2 beautiful Whimsy Designer Paper 6x6 packs, and 2 *NEW* gorgeous sets of Whimsy Prints. These new goodies are available to buy right now from the Whimsy Stamps store along with all your Whimsy favourites. We are thrilled to announce that Monika Martinson has joined our talented group of stamp illustrators! Monika draws the most beautiful floral images and we are releasing 3 gorgeous rubber stamp sets illustrated by Monika for Whimsy Stamps this month.  Welcome to the Whimsy Stamps family, Monika!

I'll give you the details about the Whimsy mini hops on the bottom of this post because now I really want to show you my card with the absolutely adorable Love you Slow Much by Sylvia Zet (available as a digital image HERE and as a rubber stamp HERE):
You may recognize Sylvia's Peggy. I told Sylvia that somehow this image, probably the hair, reminded me of a sort of Geisha and she asked me if I was going to color her hair black. That made me realize I had never done black hair before! And this hair isn't really black either, I have been google-ing images of black hair and decided I wanted brown-black hair like Beyonce has on some pictures so that's what I was aming for. The darkest parts are the 100-Copic Marker (=black) but then I went to W9, W7, E47, E44. The sentiment is from the Raindrop Echo Thank you Tabs 1 set by Whimsy Stamps and it was cut with the matching die. The designpaper is an old line from Basic Grey, Plumeria. I wanted to use a sheet of that line with little flowers because that matched the Geisha theme but as you can see, that paper didn't make it to the card :). I recently discovered a (for me) new store, Flourish with a Bling and they have this huge selection of pearls and swirls. I bought this gorgeous soft sparkling Jasmine Puffy Flourish in Lilac and decided to use that cut in pieces. The purple pearls are also from this company. The flowers are Wild Orchid Crafts and I used purple and platinum Stickles around the papers.
 A close up of the image, as always colored with Copic Markers and completely 3D paper pieced.
And the little pieces that created the image. You may notice that the dress has a little different color in the little pieces. When pieced together I didn't like the white so I added some orange, that took some very careful coloring LOL.

Our fabulous Guest Designers at Wee Stamps have more gorgeous cards to show you. Not only with Love you Slow Much but also with a new image called Birthday Baby Boy. I will show you a card with the Birthday Baby Boy tomorrow but be sure to check out the gorgeousness on the Wee blog today HERE.

And for even more inspiration there is of course the Whimsy mini hops starting today:

From today until 26 March, the Whimsy DT and our March Special Guest Designer, Louise Hodge, will be showcasing these new products with a daily mini blog hop. At the end of release week, we will draw 3 winners from the comments left on our designers' daily mini blog hop posts and each of these 3 winners will win 2 new release stamps! You have 24hrs to enter each daily mini blog hop by leaving a comment on every blog listed for that day. The prize locations are secret, so be sure to hop and leave comments every day to win! At the end of release week (Wednesday 27 March) a release round-up will be posted on the Whimsy blog together with a list of winners. To take a peek at today's fabulous new release creations, please click on the links below...

If you would like to join Whimsy Stamps as our Guest Designer for our May 2013 release please go to the Guest Designer Contest page to read all about how to enter. Entries close at 12.00pm (EST) on Wednesday 27 March 2013.
For a full reveal of this month’s fabulous release, please visit the Whimsy blog. Thanks so much for stopping by and I hope you enjoy our new release!

That's it for me today. Sorry for the long post people!!
Hugs,

dinsdag 26 februari 2013

Whimsy February Showcase day 7 with Cradled by the Moon

Hello and welcome to Day 7 of Whimsy Stamps February Rubber & Die Release Showcase!

On Wednesday (20 February) Whimsy Stamps released this month's new rubber designs, Shapeology dies, Whimsy Designer Paper packs and new Shape EZ templates. From then until today, 26 February the Whimsy Stamps DT and Special Guest are showcasing these fabulous new goodies with a daily mini blog hop and I am part of today’s hop! Each mini blog hop has a new release prize hidden somewhere along the way and you have 24hrs to enter each prize draw. To be entered into today's mini blog hop prize draw, be sure to leave a comment on ALL of the DT's posts listed below by 12.00PM EST tomorrow. All winners will be announced on the Whimsy blog on 27 February. I will give you a list of todays hops at the bottom of this post.

Today I have a little box to show you that I decorated with Crissy Armstrong's Cradled by the Moon.
Somehow this picture seems a little blurry but I hope that when you click it you will see it really isn't. Isn't this image absolutely adorable? I have created a box with on both sides a shape cut out with the Whimsy Stamps' Double Scalloped Square Doily Die. There are actually two of these shapes glued together on both sides to make the box, and especially the doily part, a little more sturdy. The inner box is 6,5x6,5x2,7 cm's. The ribbon on top of the box is Pink Petal Vanilla Latte Ribbon, also from Whimsy Stamps as are the Moon and Star charm and the Baker's Twine that the charm is hanging from. Finally the sentiment is from the Welcome Baby Sentiments set by Raindrop Echo Designs. The flowers and the pearl stars are from Wild Orchid Crafts.
Here is a close up of the gorgeous image, as always colored with Copic Markers and completely 3D paper pieced.
And the side and inside of the box. Perfect to give a little gift like some baby socks :).
And the little pieces that were used to built this image.

I hope you enjoyed my last peek for this release. To take a peek at today's fabulous new release creations by the other design team members, please click on the links bellow

Mariska (you are here)

Remember that the entire new release is available to buy right now from the Whimsy Stamps store along with all your Whimsy favourites.
If you would like to join us as our Guest Designer for our April 2013 release please go to our Guest Designer Contest page to read all about how to enter. Entries close at 12.00pm (EST) on Wednesday 27 February 2013.

Hugs,

dinsdag 29 januari 2013

Whimsy Stamps showcase day 7 with 2 Cute Ink sample

Hello and welcome to Day 7 of Whimsy Stamps January Rubber & Die Release Showcase!

On Wednesday (23 January) Whimsy Stamps released this month's new rubber designs, Shapeology dies, Whimsy Designer Paper packs, Shape EZ templates and *new* Whimsy Prints pre-coloured toppers. From then until 29 January the Whimsy Stamps DT and Special Guests are showcasing these fabulous new goodies with a daily mini blog hop and I am part of today’s hop! Each mini blog hop has a new release prize hidden somewhere along the way and you have 24hrs to enter each prize draw. To be entered into today's mini blog hop prize draw, be sure to leave a comment on ALL of the DT's posts listed below by 12.00PM EST tomorrow. All winners will be announced on the Whimsy blog on 30 January.

Today I have a sample with a second image from the Happy Birthday to You set by 2 Cute Ink.

Isn't this hippo funny? I have to admit that I have a weakness for hippos though :). The sentiment is also from a newly released set, Simple Everyday Greetings by Raindrop Echo Designs. The gorgeous corners are also newly released by Whimsy, they are the Lace Doily Corner 1, LOVE those! And the lace used on this card is also by Whimsy Stamps, it's the Lace Tape-White no.6, the adhesive to this lace is already attached so you stick it on like tape and it's gorgeous and delicate  I have inked both the sentiment and the base image (people who follow me for a longer time will know what I mean) while they were still in the die. And I have hand stitched around both the image, the sentiment and the design paper on the card. The ink I used is Frayed Burlap Distress Ink. I used the same paper pad I used for my monkey card which is Green at Heart by Basic Grey and the flowers and pearls are all by Wild Orchid Crafts.
And a close up of the little hippo, as always colored with Copic Markers and 3D paper pieced.... but I had so much fun putting this little guy together that I forgot to take a picture of the little pieces :(.

To take a peek at the gorgeous creation made by the other DT members in today's hop, please click on the links below

Mariska (but you are here already)

Remember that the entire new release is available to buy right now from the Whimsy Stamps store along with all your Whimsy favourites.

If you would like to join us as our Guest Designer for our March 2013 release please go to our Guest Designer Contest page to read all about how to enter. Entries close at 12.00pm (EST) on Wednesday 30 January 2013.

Hope to be back soon with a new creation!!
Hugs,

woensdag 5 december 2012

Whimsy November review

Hi everybody!!
 
Today is the review day for the Whimsy Stamps November release. Now I have been a bad Special Guest designer... I have completely missed the release until now. But I hope to make it up a little with this project, I used a lot of new gorgeous Whimsy products on it :).
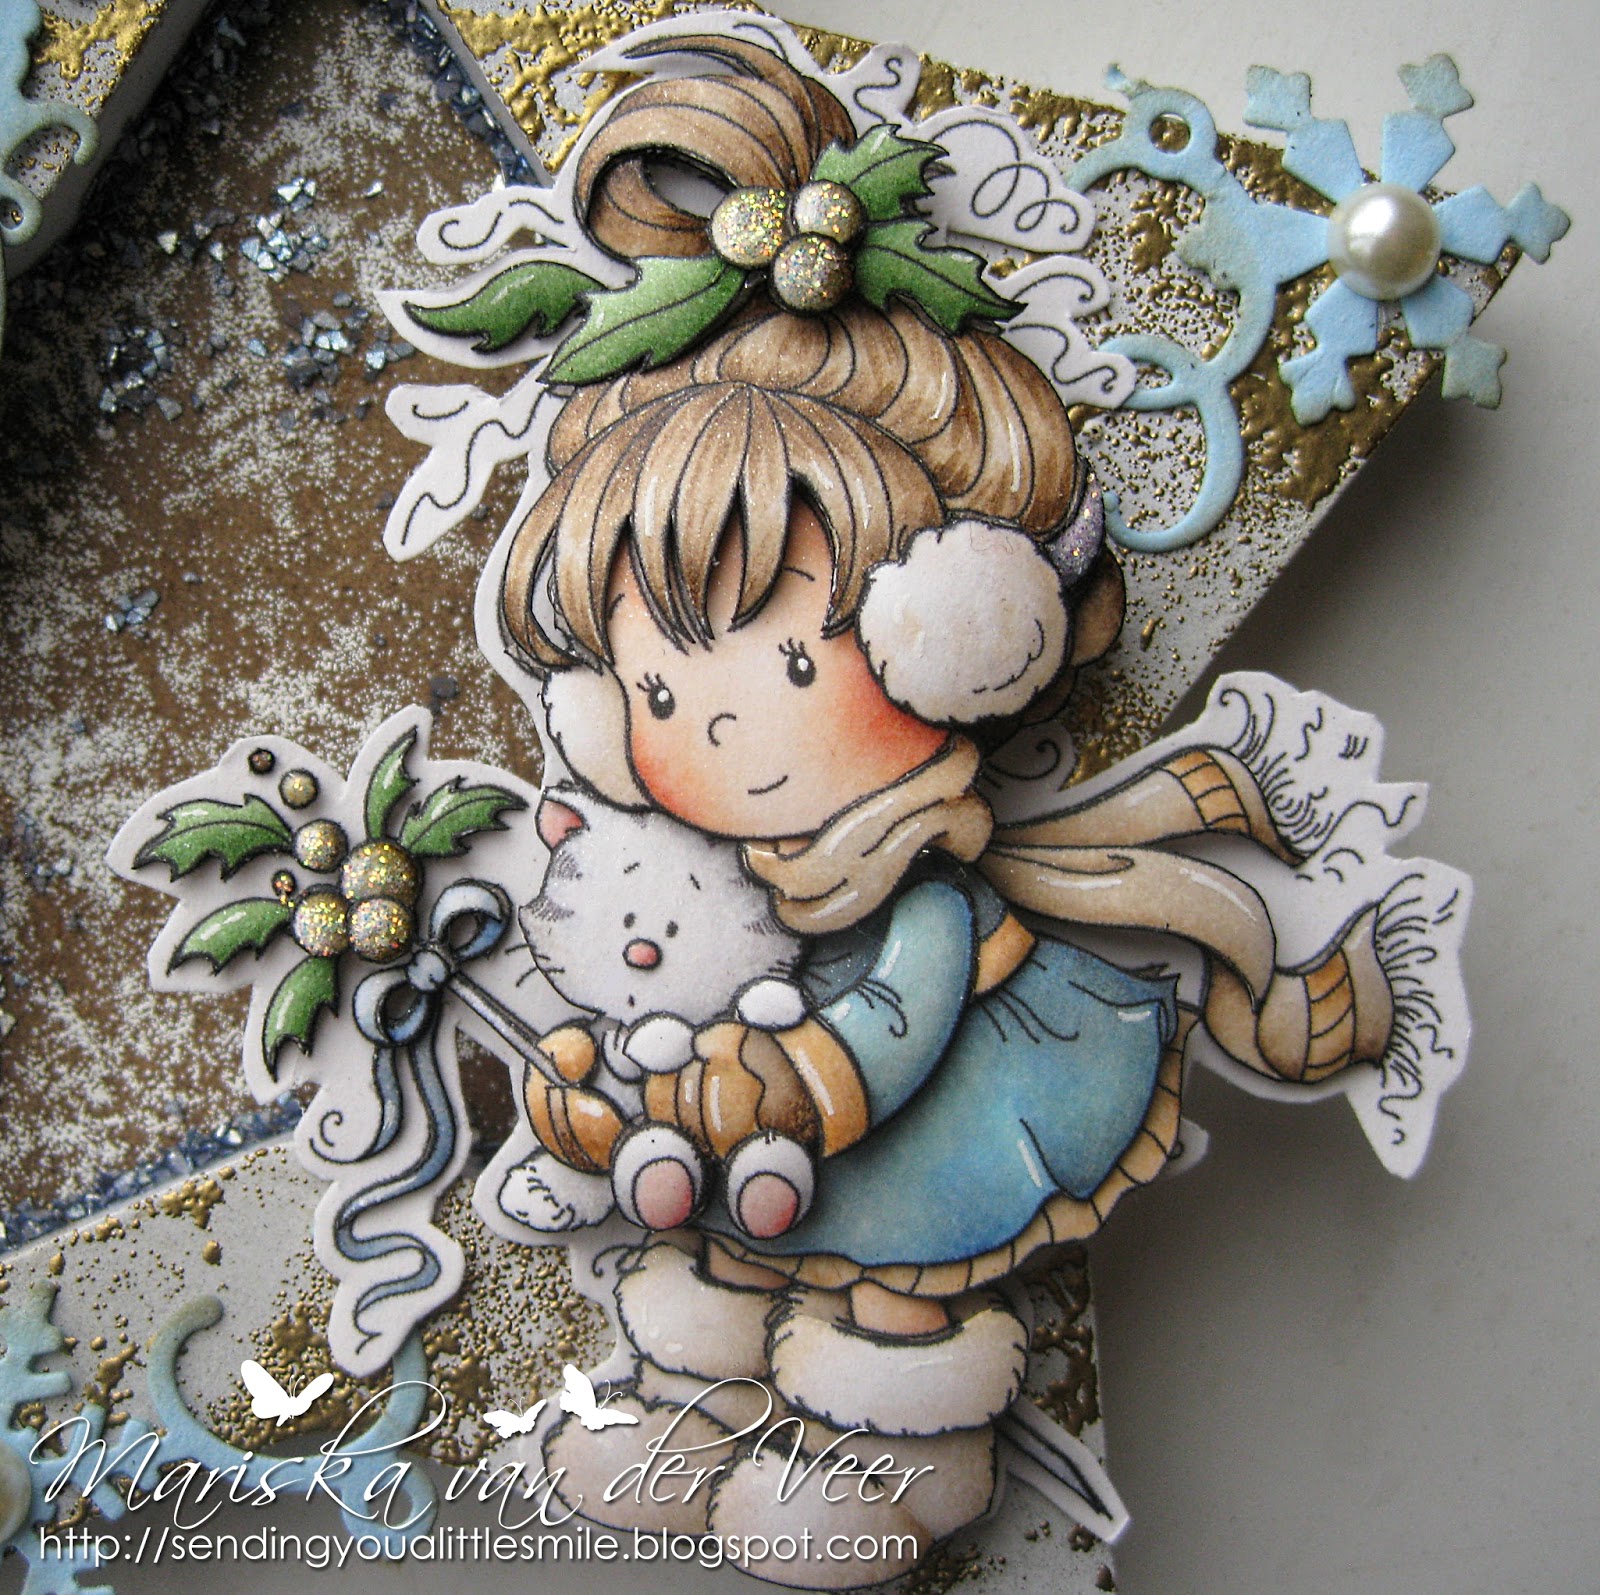
First of course, gorgeous Berry by Wee Stamps. I totally adore this little lady. You'll notice that I didn't color her berries red like you would expect but I decided to make them nice and golden. The base of the project is a white star shaped picture frame, I have used a little bit of distress ink on the white, stamped the new gorgeous Snowflake Background on it with clear embossing ink, added golden embossing powder and melted that. On the inside I took the wooden inside of the frame, distressed that with Walnut Stain ink, again stamped the Snowflake background on it and this time added white embossing powder and melted that. The blue sparkle is Stampendous Crushed Glass Glitter, I applied some Olba Glue here and there and sprinkled the crushed glass flakes into the glue.
The sentiment is from the new Snowflake Mini Letter Seals. and the snowflakes are pieces of a strip cut with the new Snowflake Border Die, a little distressed and with a pearl on top :). The ribbon on top is from stash and the berries are Magnolia. I got the star shaped picture frame at a Dutch store named Blokker.
A second picture. I couldn't get a picture that I was really satisfied with (you can see the weather isn't very good here) so I figured I'd show you the two best ones.
A close up of gorgeous Berry. As always colored with Copic Markers and completely 3D paper pieced.
And the little pieces that make gorgeous Berry and her kitten. Lots of little pieces :).

By special request, the Copic colors I used are:
Hair: E44, E42, E41, E40
Skin: E11, E00, E000, E0000
Cheeks: R22, R20, R00
Kitty: C4, C3, C1, C00, W3, W1, W00 and R22, R20, R00
Dress: W5, W3, W1, W00, B95, B93, B41, B00
Accents on dress: E55, E53, E51
Skarf+ mittens: E44, E42, E41, E40 and E55, E53, E51, E50
Boots+ mufs: E53, E41, E40, W00, CB
Berries: E87, E84, E81, CB (and diamond Stickles)
Headband for mufs: C5, C3, C1, W3, W1
Wand: C4, W3
Leaves: YG67, YG63, G21

Hope you like my new project!!

vrijdag 16 november 2012

Have a Merry Mousy Christmas

Hi everybody!!

You may have already seen the card I'm showing today, it's been on the Copic Marker Europe blog yesterday, I made this card using Christmas Star Henry Mouse by Whiff of Joy.
 
When I saw this cute little mouse for the first time I knew I had to have him. I colored him in a vintage kind of way with my Copic Markers. I have listed the colors I've used on the Copic Marker Europe blog if you want to take a look. The gorgeous snowflake is a die set by Whiff of Joy. The sentiments are from a set named Holiday Mini Tickets and they have a matching die, both are available at Whimsy Stamps. The paper is Basic Grey Wassail and the ribbon is from stash. The square and rectangle shapes used behind the image and (cut into four pieces) behind the corners are both Spellbinders. Everything has been distressed with Walnut Stain and Frayed Burlap distress inks and platinum Stickles.
This is a close up of sweet Henry. The star has been glittered up with Diamond Stickles.
As always Henry was completely 3D paper pieced, in the picture above you see the little pieces it took to create this little mouse.

Hope you like my card with cute little Henry. See you back soon!!!

Hugs,


woensdag 7 november 2012

Whimsy Stamps October review

Hi everybody!!
 
If you've missed the winners to my blog candy, that's in the post below this one. I'd also like to ask you all again to vote for your favorite in the Fashionista Challenge. I'm in the top ten with my decorated Ruby Box and of course I would love to win but only if people think my card deserves to win so please, vote for whoever is your favorite.
 
Now it's time for the review of the October Whimsy Stamps release. I decided to use this adorable winter image by Crissy Armstrong named Sheltered love.
Isn't that image just precious? I really wanted to keep the card simple to show off the image so I framed the image with two corners that I cut using THIS die from Noor! by Joy Crafts. The sentiment is from the Holiday Notables 2 set by Raindrop Echo Designs. Then all I used on the card is some Aspen Frost 6x6 design paper by Basic Grey, Cherry Cobbler cardstock from Stampin Up that is finally available in The Netherlands and that I bought from Krista Huysman. I did some stitching by hand again and used some Viva Eiskristall that I threw in some Stardust Stickles. I'd like to thank Monique Lokhorst for this tip, I was at the Dutch KreaDoe fair this past weekend and when checking out the Magnolia booth  with all the gorgeous samples by their design team, I was drawn to her card that were glittering from a mile away. If you read this Monique, I ordered it from Doe-a-Ding and love it, thank you!
A close up of the cute little family.
And the little pieces, as always colored with my precious Copic Markers.

See you back real soon!!!
Hugs,

zaterdag 27 oktober 2012

Fourth Whimsy Stamps release showcase day with sample

Hello and welcome to Day 4 of our October Rubber & Die Release Showcase!

On Wednesday (24 October) Whimsy Stamps released this month's new rubber designs, Shapeology dies, Whimsy Designer Paper packs and Shape EZ templates. From then until 30 October the Whimsy Stamps DT and Special Guests are showcasing these fabulous new goodies with a daily mini blog hop! Each mini blog hop has a new release prize hidden somewhere along the way and you have 24hrs to enter each prize draw. To be entered into today's mini blog hop prize draw, be sure to leave a comment on ALL of the DT's posts listed below by 12.00PM EST tomorrow. All winners will be announced on the Whimsy blog on 31 October.
 
Today I have a box to show you decorated with an image by Sylvia Zet.... meet gorgeous Ruby!
Isn't she GORGEOUS!!! I adore her hair, her clothes and her pretty bunch of flowers. The tutorial is also by Whimsy stamps, it is part of the Friendship Ticket Sentiments, cut with the matching die. Other Whimsy products used on this box are the Pink Pettal Ribbon that I used on the tag and the Lace Tape, real lace but with an adhesive layer behind it, super easy to use!!

The stitches have, as always, been done by hand. The gorgeous oval shape is again my new Floral Ovals by Nestabilities. The pretty flowers are, with a HUGE thank you to Raffaella Perego for the inspiration, Posy Patch Flowers by Heartfelt Creations. The pretty paper is Maja Design Mina Vanner Rosa-Marina collection (hope I got that right) combined with kraft and pink cardstock. The tag is from stash. The pretty lace corners are cut from large square doillies that I bought on Ebay. The pearls on the oval and in the corners are by Melissa Frances and in the centers of the flowers I used white liquid pearls. Stickles used are Diamond and Platinum and I used Frayed Burlap distress ink around the edges of the paper.
A close up of the image, as always colored with Copic Markers and completely 3D paper pieced.
 A side view of the box, see the dimension?
And the little pieces this cutie was made off. As you can see I hadn't cut the flowers at this point. I have first glued all the cut pieces as shown on this picture using the fabulous Olba Glue, available in the USA only at Whimsy Stamps, and as a last step cut, side colored, embossed and adhered every flower one by one.

Well, hope you like my creation. To take a peek at today's fabulous new release creations, please click on the links below

Beate Johns
Ellie Stover
Iris Wiechmann
Michele Roos
Jacqueline Beddingfield


Remember that the entire new release is available to buy right now from the Whimsy Stamps store along with all your Whimsy favourites.

Oh and I would like to also enter this card into the current Fashionista Challenge which still is Anything Goes.
En ik wil deze doos graag mee laten doen aan de challenge van Crealing welke is Zelfgemaakte bloemen.

Hugs,


zondag 21 oktober 2012

A cute little Magnolia bear

Hi everybody!!

This card was up on the Copic Marker Europe blog yesterday so you may have already seen it there but just in case you haven't.... I went out of the box and used a Magnolia :). I know a lot of you go of to the box when you don't use a Magnolia but I think this is my third (?) Magnolia project.
My friend Alberto has been asking me to do one for some time now so Alberto if you read this.... it isn't Tilda but see, I do sometimes do Maggies :). I actually colored this gorgeous little bear named Coco first this time and tried to find matching papers later. I colored Coco very warm with typical Christmas colors and to keep the card "calm" I decided to use papers that were less colorfull, these gorgeous papers are from an older Basic Grey line, Wassail. The Sentiment is from a Holiday Circle Pennants set from Whimsy Stamps' Raindrop Echo Designs. The flowers reflect the gorgeous Christmas colors again. Everything has been touched with Vintage Photo Distress ink and Picket Fence Distress Cracle Paint. The gorgeous oval die is from the Floral Ovals set from Spellbinders. Everything has been handstiched.
A close up of sweet little Coco, as always 3D paper pieced for extra dimension. I used diamond stickles on the ribbon around the gift and on her nose is some Glossy Accents. My stamped impression wasn't perfect by the way and the nose and eyes of Coco weren't as black as I wanted, a little tip is to buy a Copic Multiliner, these are perfect for those situations, you can make the black absolutely black with the Multiliner and the Copic Markers won't make the ink of the Multiliner run.
And the little pieces :). I actually love how this card turned out. May have to use Magnolia's more often :). If you want to know the Copic markers I used to color Coco please visit the Copic Marker Europe blog, I listed them there.

I'd like to enter this card into the 8th challenge at the Fashionista Challenge blog which is Anything Goes.

See you guys soon!!!
Huggies ;),