
Hi everybody,
As you may have seen I have created two stamped image holders or wallets in the last weeks. I got a lot of questions about those and several people have asked me for a pattern or a tutorial. Well.... here it is :). Of course you don't have to make this wallet for stamped images, you could also make it for recipe cards (there are a lot of very suitable stamps out there) or bandages (again, I can think of several very suitable stamps) or whatever!
I created a third wallet to show you how the wallet is made and here is a picture of this third finished wallet:
 Design papers, velvet and sparkly cardstock used are old Doodlebug papers and the image is by Hanglar & Stanglar. Decorations are from Wild Orchid Crafts.
 On to the tutorial, I'm doing it completely in cm.'s. If you want to know the sizes in inches there are several converters online, HERE is one of them, I have never used this one though so if there is anybody with a converter they have used and would recomment please mention this in my comments and I will mention this in my post.
For this wallet you'll need two 30,5x30,5 cm. sheets of cardstock. Some design papers, something to score with and to cut with, if you do this by hand you'll also need a ruler. Glue of course and things like flowers and such to decorate with.
Take your first piece of cardstock and cut it to 30 x 20,5 cm.'s. Now you are going to score it as shown on the picture below. The red lines are the score lines. If you click the pictures you'll get a larger view and the numbers will be easier to read:
 Next you are going to cut on the blue lines as shown below. The red dotted lines are the scores you made earlier and the thin blue diagonal marks are the pieces of paper that are going to be cut completely away:
 Now the second sheet of cardstock you are going to cut to 30 x 30 cm. Again you are going to score as shown on the red lines below:
 Now again you are going to cut on the blue lines as shown below. Again the thin blue diagonal lines are to mark the pieces that are going to be completely cut away:
 Now your piece of 30 x 20,5 cm. cardstock will look like this (without the coloured marks of course):
 and your 30 x 30 cm. piece of cardstock will look like this:
 You are now going to glue the purple marked area on top of the orange marked area. The green marked area's I always strengthen (I don't know if this is the right word but I'm sure you'll know what I mean) with extra pieces of thin cardboard. After this step your project should look like this:
 As you will have seen I have also glued a piece of thin cardboard to the middle area which will be the back of your wallet. You now fold all of the scored lines and next:
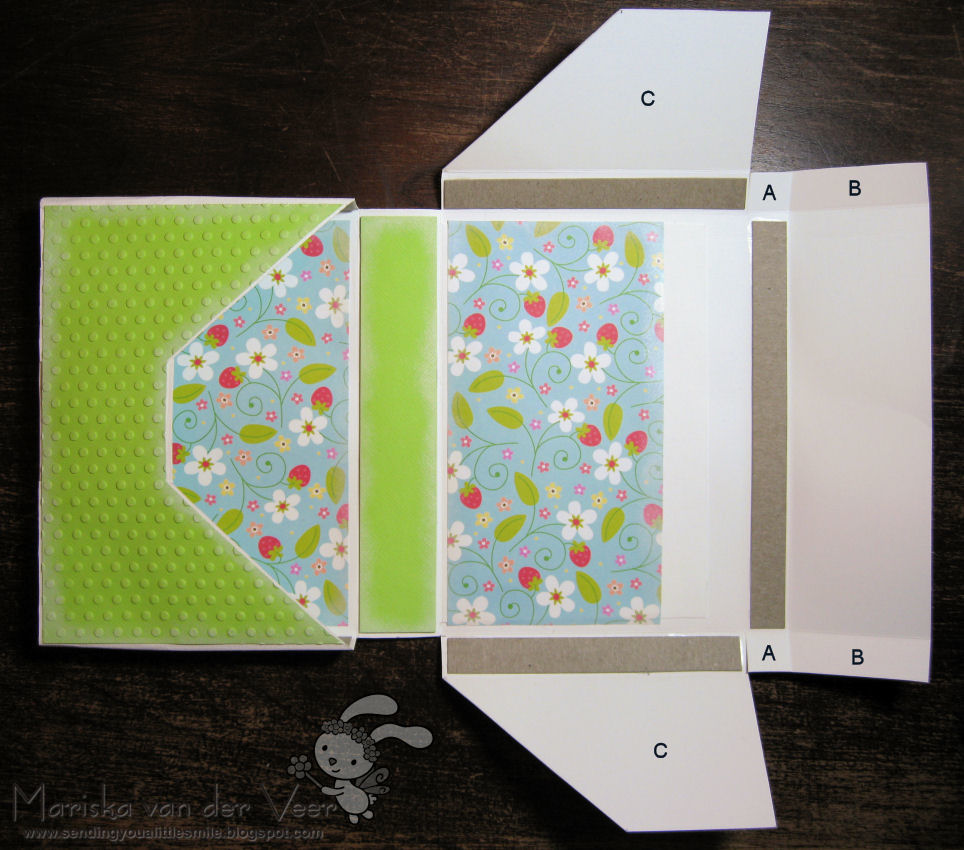 I decorate the inside of the box and glue the pockets of the wallet together. As you can see the left side of the wallet is done and the right side isn't. First you glue the back of piece A onto piece B like this:
 Now you are going to fold the piece you have just glued together in and you glue piece C over this piece like this:
 If you have done this on both sides it is now time to decorate. This is my finished inside:
 And my finished outside:
 I hope that explanation was clear enough for you all to follow. If not, please let me know what you don't understand in the comments under this post and I'll try to explain more clearly.
Now the next piece of text was inspired by a tutorial my friend Inge did the other day and I thought her words on the end of that tutorial were spot on so here goes:
As you know I love to be creative and I love to share the things I have made and the way I have made them. However, this tutorial did take me a lot of time to make and if you do decide to use it and place the result on your own blog I would very much appreciate it if you would place a link in your post to this tutorial, a lot of blog-readers allready do this and I really appreciate this! This tutorial wasn't created for any commercial goals whatsoever and I would appreciate it if you wouldn't use it for such purposes, this includes doing workshops or creating own tutorials.
That's it!! Please have fun and I would really love it if you would let me know what you think about this tutorial and if you'd let me know when you have used my tutorial and have placed your creation on your blog!
Take care!
Mariska
Hallo Mariska,
BeantwoordenVerwijderenBedankt voor deze uitleg, dankzij de duidelijke tekeningen moet het gaan lukken toch? Ik vind deze kaartdoosjes ontzettend leuk en heb die je voor Nicole hebt gemaakt vorige week in het echt gezien, ontzettend mooi!
Groetjes Thea
wow ziet er gaaf uit hoor , superr groetjes christa
BeantwoordenVerwijderenDat is een hele goede uitleg hoor, tenminste ik snap 'm, geloof ik, haha! Heel mooi gemaakt zeg, en van die lekkere vrolijke kleurtjes heb je gebruikt!
BeantwoordenVerwijderenWat een gave tutorial Maris, heel duidelijk en superleuk! Thanks for sharing;)ik ga 'm zéker een keer maken.
BeantwoordenVerwijderenHoi Mariska,
BeantwoordenVerwijderenDank je wel voor de duidelijke uitleg. Ik wil hem voor mezelf zeker gaan maken. Zie hem ook al voor me als cadeautje, maar dan met leuke bijpassende zelfgemaakte kaartjes erin.
Groetjes,
Marie-Anne
Wat een leuk doosje weer. Moet ik nu toch echt ook eens gaan maken. Dank je wel voor de zeer duidelijke uitleg en al de tijd die je er in gestoken hebt.
BeantwoordenVerwijderenBedankt meiden!! Toch altijd spannend zo'n tutorial maken... ik geloof alleen dat ik hem net zo goed in het Nederlands had kunnen maken ;).
BeantwoordenVerwijderenxxx
Mariska
Hoi Mariska,
BeantwoordenVerwijderenHardstikke leuke en duidelijke tutorial.
Ik had zo'n creatie van jou al gezien bij Nicole en vond hem zo leuk!!
Ik ga hem zeker maken.
Bedankt voor de tijd die je hierin gestoken hebt.
groetjes, Frouwkje.
Wowwww Mariska,Wat schitterend gemaakt,zo lief die stempel,mooi ingekleurd.
BeantwoordenVerwijderenEn wat een prachtig papier.
Liefs knuf Riet.x
Prachtig
BeantwoordenVerwijderenGroet,Marian
Oh this is so sweet Mariska and gorgeous too. Fabulous tutorial.
BeantwoordenVerwijderenluv
Debby
hi mariska,
BeantwoordenVerwijderenThank you for this tutorial it's so sweet and I love your coloring
hugs Lia
Dak je wel Mariska,
BeantwoordenVerwijderenIk vind hem prachtig en ga hem zeker een keer maken :).
groetjes Monique
Lieve mariska,
BeantwoordenVerwijderenHeel heel erg bedankt het is heel duidelijk uitgelegd.Wat een werk voor jou zeg! Maar ontzettend gewardeerd.Lieve groet Yvon
Geweldig Mariska, komt op mijn todo-verlanglijstje! Bedankt voor de duidelijke beschrijvingen. Tjonge, wat een werk! Dankjewel!
BeantwoordenVerwijderenHugs Ing
Superleuk!!!
BeantwoordenVerwijderenGa het zeker eens proberen te maken.
Enneh nogmaals bedankt voor je "hulp"
Groetjes Janet
Geweldig Mariska, ik ga hem zeker maken en zal doorlinken naar je site meis, heel hartelijk bedankt voor het delen van deze tutorial,
BeantwoordenVerwijderengroetjes Angelique
Hallo Mariska,
BeantwoordenVerwijderenop deze uitleg van jou zat ik te wachten. Ik had hem gezien bij Nicole en vond hem geweldig om cadeau te doen voor mijn zusje die a.s. maandag jarig. De stempelafdrukjes zijn al gemaakt, alleen nu de buitenkant nog even. En met deze heel duidelijke uitleg gaat dit zeker lukken. Heel erg bedankt daarvoor.
Als ik hem op mijn blog plaats link ik zeer zeker ook even naar jou. Zoals het hoort, toch!
groetjes,
Janna
Fabulous i Must try this
BeantwoordenVerwijderenlove debbie xxx
Hallo Mariska,
BeantwoordenVerwijderenBedankt Maris wat een duidelijk uitleg.
En wat een schitterend kaartendoosje.
Groetjes Margreet
hi Mariska1
BeantwoordenVerwijderenThank you so much for the tutorial.
and thank you so much for doing it in cm, dont ever stop doing that,lol, for real that was so helpful when it is in cm. ill be doing this tut, when i do i will let you now ( i hope ill remember to, cause im really confused and forgetting things all the time, i guess its becose of my medication,lol)
love your blog. im a follower now. hugs
Hoi Mariska,
BeantwoordenVerwijderenIk heb de wallet die ik wilde maken, met kaartjes erin als een cadeautje eindelijk af en gefotografeerd. Morgen komt hij op mijn blog te staan met een link naar jouw blog en een link naar de tutorial op jouw blog. Ben nog steeds erg blij met de uitleg.
Groetjes,
Marie-Anne
Hoi Mariska,
BeantwoordenVerwijderenIk had al een reactie achtergelaten.
Jij wilde toch graag weten als iemand hem gemaakt had??
Ik heb hem gemaakt en als candy op mijn blog gezet.
Bedankt voor je uitleg!!
Hier staat hij te 'pronken':
http://mypassionforcolorscardsbyfrouwkje.blogspot.com/
groetjes, Frouwkje
Geweldig project en een prima tutorial!! Deze ga ik ook eens proberen.
BeantwoordenVerwijderenGroetjes inge