
Hi everybody,
As you may have seen I have created two stamped image holders or wallets in the last weeks. I got a lot of questions about those and several people have asked me for a pattern or a tutorial. Well.... here it is :). Of course you don't have to make this wallet for stamped images, you could also make it for recipe cards (there are a lot of very suitable stamps out there) or bandages (again, I can think of several very suitable stamps) or whatever!
I created a third wallet to show you how the wallet is made and here is a picture of this third finished wallet:
 Design papers, velvet and sparkly cardstock used are old Doodlebug papers and the image is by Hanglar & Stanglar. Decorations are from Wild Orchid Crafts.
 On to the tutorial, I'm doing it completely in cm.'s. If you want to know the sizes in inches there are several converters online, HERE is one of them, I have never used this one though so if there is anybody with a converter they have used and would recomment please mention this in my comments and I will mention this in my post.
For this wallet you'll need two 30,5x30,5 cm. sheets of cardstock. Some design papers, something to score with and to cut with, if you do this by hand you'll also need a ruler. Glue of course and things like flowers and such to decorate with.
Take your first piece of cardstock and cut it to 30 x 20,5 cm.'s. Now you are going to score it as shown on the picture below. The red lines are the score lines. If you click the pictures you'll get a larger view and the numbers will be easier to read:
 Next you are going to cut on the blue lines as shown below. The red dotted lines are the scores you made earlier and the thin blue diagonal marks are the pieces of paper that are going to be cut completely away:
 Now the second sheet of cardstock you are going to cut to 30 x 30 cm. Again you are going to score as shown on the red lines below:
 Now again you are going to cut on the blue lines as shown below. Again the thin blue diagonal lines are to mark the pieces that are going to be completely cut away:
 Now your piece of 30 x 20,5 cm. cardstock will look like this (without the coloured marks of course):
 and your 30 x 30 cm. piece of cardstock will look like this:
 You are now going to glue the purple marked area on top of the orange marked area. The green marked area's I always strengthen (I don't know if this is the right word but I'm sure you'll know what I mean) with extra pieces of thin cardboard. After this step your project should look like this:
 As you will have seen I have also glued a piece of thin cardboard to the middle area which will be the back of your wallet. You now fold all of the scored lines and next:
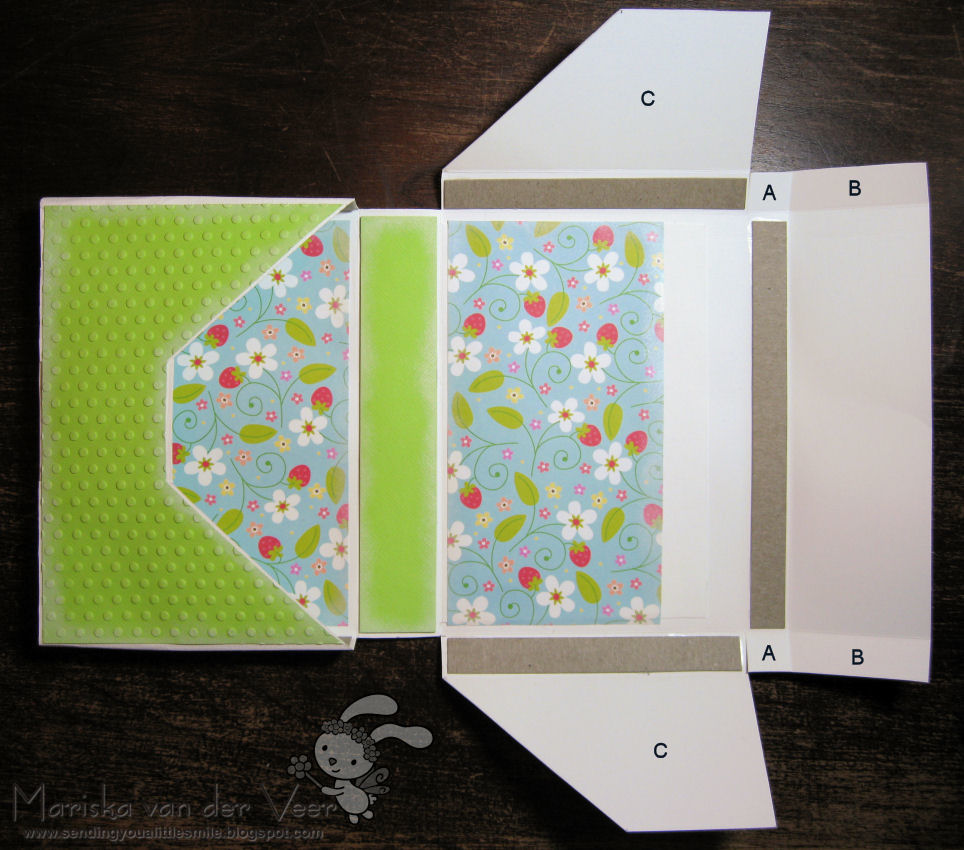 I decorate the inside of the box and glue the pockets of the wallet together. As you can see the left side of the wallet is done and the right side isn't. First you glue the back of piece A onto piece B like this:
 Now you are going to fold the piece you have just glued together in and you glue piece C over this piece like this:
 If you have done this on both sides it is now time to decorate. This is my finished inside:
 And my finished outside:
 I hope that explanation was clear enough for you all to follow. If not, please let me know what you don't understand in the comments under this post and I'll try to explain more clearly.
Now the next piece of text was inspired by a tutorial my friend Inge did the other day and I thought her words on the end of that tutorial were spot on so here goes:
As you know I love to be creative and I love to share the things I have made and the way I have made them. However, this tutorial did take me a lot of time to make and if you do decide to use it and place the result on your own blog I would very much appreciate it if you would place a link in your post to this tutorial, a lot of blog-readers allready do this and I really appreciate this! This tutorial wasn't created for any commercial goals whatsoever and I would appreciate it if you wouldn't use it for such purposes, this includes doing workshops or creating own tutorials.
That's it!! Please have fun and I would really love it if you would let me know what you think about this tutorial and if you'd let me know when you have used my tutorial and have placed your creation on your blog!
Take care!
Mariska


